In Part 1 of the personal website creation, we discussed how to create a personal website using Hugo software and its themes. It provided a brief description of how to use Hugo and run the website locally. The post also explained the benefits of using Hugo, such as its fast rendering speed and easy customization options. Overall, the post served as a helpful guide for anyone looking to create a personal website with Hugo.
Being said that our website is still running locally. No matter how beautiful the website it, the recruiter or your followers will not know until it is publicly accessible. Fortunately, AWS cloud infrastructure comes to the rescue! You can easily deploy your website and make it accessible to recruiters, followers, and anyone else who wants to check it out.
In this blog post, we’ll walk through the steps of deploying a personal website created with Hugo to the AWS cloud. Specifically, we’ll use an S3 bucket as a static website, Cloudfront as the CDN, and Route53 to host and manage the domain name.
Assumptions
I don’t want to make it sound very easy here to deploy a website. Also, this is not a step-by-step tutorial blog. The aim of the blog is to give you an idea of how to achieve creating your personal website quickly. You would still need some skillset to understand and deploy your website to the AWS. So I’m assuming that you have the following proceed further.
- Basic knowledge of AWS services, including S3, Cloudfront, and Route53
- have access to an AWS account and is authorized to create and manage resources in it
- familiarity with the Hugo software and has already created a personal website using it
- a domain name registered and ready to use for your website
- Basic knowledge of DNS and how it works to understand the instructions related to Route53
- understand the importance of security and the cost associated with AWS
Beware that using resources in the AWS Account will incur costs. Also sharing your AWS credentials with Admin access will result in unnecessary costs so make sure that you must take care of those security-related activities seriously.
S3 Bucket & Static Website
Amazon S3 is a highly scalable and reliable object storage service that can store and retrieve any amount of data from anywhere on the web. An S3 bucket essentially stores data objects, such as text files, images, and videos. It can be used for a wide range of purposes, including backup and archiving, data analytics, and, of course, hosting static websites.
A static website is a collection of HTML, CSS, JavaScript, and other web files that are stored on a server and delivered to users as-is, without any server-side processing. In other words, a static website does not require any server-side code or database to function, and it can be hosted on a wide range of platforms, including S3.
One of the main benefits of using an S3 bucket to host a static website is its cost-effectiveness. S3 charges only for the storage and data transfer your website uses, which can be significantly lower than the cost of hosting a dynamic website on a traditional web server.
In addition, S3 provides a highly reliable and scalable platform for hosting static websites. With S3, you can easily replicate your website files across multiple geographic locations for high availability and low latency.
Create an S3 Bucket for the website
Creating a static website in an S3 bucket is a straightforward process. First, you need to create an S3 bucket and configure it to host a website. Then, you can upload your website files to the bucket and make them publicly accessible.
To configure your S3 bucket for static website hosting, simply follow these steps:
- Log in to your AWS Management Console and navigate to the S3 service
- Click “Create bucket” and follow the prompts to create a new bucket
- Select your new bucket and navigate to the “Properties” tab
- Under “Static website hosting,” enable “Static hosting” for the bucket
- Enter the “Index document” and “Error document” fields with the names of your website’s index and error pages, respectively
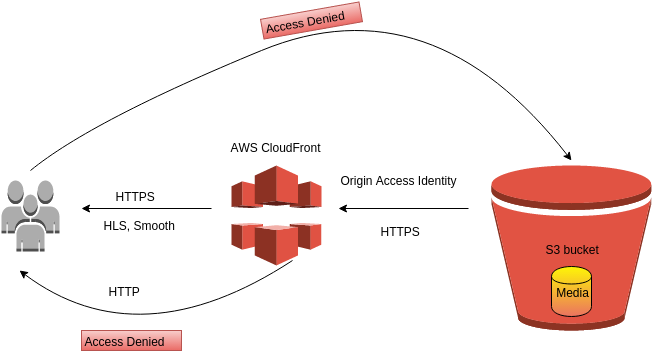
That’s it! Your S3 bucket is ready for you to upload your Hugo website to make it public. In the bucket policy, you have to grant Read access to the Origin Access Identity to the CDN which you will be creating in the next step. This will allow the objects to be read for public access only from the configured domain name.
Create the CloudFront CDN
When it comes to hosting a website on AWS S3, you may be wondering how to improve its performance and speed for your users. One solution is to use Amazon CloudFront, a content delivery network (CDN) that can cache and distribute your website’s content globally, reducing latency and improving user experience.
A CDN is a network of servers distributed around the world that can store and serve content to users from the server that is closest to them. By caching and distributing content, a CDN can reduce the amount of time it takes for a website to load, improving performance and user experience.
Amazon CloudFront is a CDN service provided by AWS that can cache and distribute your website’s content, including HTML, CSS, JavaScript, images, and videos, to users around the world. CloudFront can help improve website performance, reduce latency, and handle traffic spikes by caching and delivering content from the edge location closest to the user. AWS CloudFront integrates with the AWS Certificate Manager thus providing free SSL certificates for your personal website.
To use CloudFront with an S3 bucket hosting a static website, you need to create a CloudFront distribution that points to the S3 bucket as its origin. Here are the general steps to set this up:
- Create a new CloudFront distribution in the AWS Management Console, selecting “Web” as the delivery method
- Enter your S3 bucket URL as the “Origin Domain Name” for the distribution. Make sure you choose
custom origininstead ofs3 origin - Configure the other CloudFront settings as desired, such as the SSL certificate, cache behaviour, and price class
- Configure the “Alternate Domain Names”, and “Redirect HTTP to HTTPS” setting to make sure your website is
Once you’ve set up your CloudFront distribution, it will cache and distribute your website’s content from edge locations around the world, reducing latency and improving performance for your users. It takes a while to deploy the cache globally.
Configure your Route 53
As I mentioned in the assumptions section, I am expecting you to have a domain name available to use for your website. I have configured mine in the Hosted Zone in AWS Route 53. You can use the same in your AWS Account by creating a Hosted Zone and configuring the NameSevers of the DNS into your registrar like GoDaddy. If not, you can still use the registrar’s DNS management. AWS Route 53 is not free and it will incur you $6 per year per HostedZone.
All you need is your CloudFront distribution domain name which will be like “
Deploy your website
To generate the static website files using Hugo, you need to run the following command in the personal website project that you created. You need to run this command on the root folder where config.toml file is present.
$ cd my-website
$ hugo --minify
The flag --minify helps to minify the generated HTML, CSS, and JavaScript files. Minification is the process of removing unnecessary characters, such as white space, comments, and line breaks, from code to reduce its file size and improve website performance. When you run hugo --minify, Hugo will apply minification to your site’s HTML, CSS, and JavaScript files, resulting in smaller file sizes and faster load times for your website. This can be particularly useful for optimizing your website’s performance on mobile devices or in areas with slow internet connections.
It’s worth noting that while minification can improve website performance, it can also make code harder to read and debug, so it’s important to balance the benefits of minification with the readability and maintainability of your code.
All the static site files will be generated inside the folder public. You’ll need to upload all of the files in the public folder to the S3 bucket.
To do this, navigate to the “Upload” button and follow the prompts to upload your files.
Congratulations 🎊🎉! You now have your website running on AWS which is public.
Things to remember
AWS CloudFront caches the websites globally so if you upload a new copy of your website, there is a high chance you will not be seeing your latest changes. To avoid this issue, you need to invalidate the objects every time you upload the website to S3.
- Go to your CloudFront Distribution
- In the Invalidations tab, click on the button “Create invalidation”
- In the “Path”, mention
/*which will invalidate all the contents in the distribution - Click “Create Invalidation”
CloudFront will then start processing the invalidation request and will remove the cached content from the specified paths in all edge locations. The time it takes to complete the invalidation will depend on the amount of content being invalidated and the number of locations where the caching is done. Each AWS account give 1000 free invalidations per month. Anything more than that will incur cost. Therefore, it’s recommended to use them judiciously and only when necessary.
Reference
Image Courtsey from ToTheNew Blog


